1997 Club Car DS Derelict Project

This didn't start out as a big project, I just wanted to get this broken down beater to run well enough to use at my campground.

But as often happens with these things, one thing led to another and the next thing you know you're ordering custom Earl Scheib stickers for the sides.
 

Attachments

  • 346055033_6184152594966309_5917461418788984773_n.jpg
    346055033_6184152594966309_5917461418788984773_n.jpg
    163.9 KB · Views: 14
  • IMG_20230704_190800455.jpg
    IMG_20230704_190800455.jpg
    199.6 KB · Views: 14
I documented the AC conversion here 1997 Club Car DS Restomod

To summarize. I stripped the cart down to the frame and tossed the original motor, controller, V glide, and wiring harness.

The Navitas 440amp/4kw AC kit required the installation of an IQ wiring harness and MCOR kit from Revolution Golf Cars Web Store

For batteries I opted for the 2x Eagle Kit from bigbattery.com
 

Attachments

  • IMG_20230704_190917141.jpg
    IMG_20230704_190917141.jpg
    113.8 KB · Views: 3
  • IMG_20230704_190934131.jpg
    IMG_20230704_190934131.jpg
    95.2 KB · Views: 3
Except for the flame stickers, the body wasn't in bad shape.

Using JB Weld Plastic Bonder I filled all the holes in the bagwell and the "no step" pads on the fenders, then sanded everything down with 150 grit sandpaper.

The hardest part of the prep was removing the flame stickers. I used a heat gun and burned my fingertips on the hot stickers several times.

There aren't a lot of pictures because it was hot as hell and I just wanted to get it done.
 

Attachments

  • IMG_20230614_183437558.jpg
    IMG_20230614_183437558.jpg
    204 KB · Views: 3
  • IMG_20230613_112803269.jpg
    IMG_20230613_112803269.jpg
    156.7 KB · Views: 3
  • IMG_20230613_112809733.jpg
    IMG_20230613_112809733.jpg
    187.4 KB · Views: 5
This cart is going to be used at my campground where all the roads and paths are gravel and sand. There's no pavement anywhere and we're not allowed to drive on the turf.

A nice paint job would become not-so-nice very quickly. So I opted to paint the body with Harbor Freight truck bed liner. It would be durable and easy to touch up. Also, very cheap.

A couple of the reviews said to apply it with a high density foam roller for a smoother finish, so that's what I did. And it was a big mistake.

The smell when I opened the can should have tipped me off; it smelled like airplane glue. And it began to eat my foam rollers immediately, so much so that I could see streams of the foam roller coming off and mixing with the paint. It is the farthest thing from a smooth finish you can imagine.
 

Attachments

  • IMG_20230704_211559460.jpg
    IMG_20230704_211559460.jpg
    115.8 KB · Views: 5
  • IMG_20230704_211550481.jpg
    IMG_20230704_211550481.jpg
    134.7 KB · Views: 5
  • IMG_20230704_211615095.jpg
    IMG_20230704_211615095.jpg
    164.3 KB · Views: 5
So I decided to go with it, make it look bad deliberately. I primed the roof with Rustoleum red primer and then applied the bed liner in a patchy, sloppy fashion.

The rear bumper is 2 x 4's fastened together with pocket holes and secured to the cart with 3/8 carriage bolts.

The dashboard is HECASA carbon fiber with toggle switches and extenders. The switches are left to right: On/Off (key switch), Forward/Reverse, and hazard flashers. On the left is the Navitas OTF programmer.
 

Attachments

  • IMG_20230704_211514841.jpg
    IMG_20230704_211514841.jpg
    54.3 KB · Views: 6
  • IMG_20230704_190812563.jpg
    IMG_20230704_190812563.jpg
    175.6 KB · Views: 6
The icing on the cake is is the Earl Scheib stickers I had made.

I think they really tie the whole thing together. :p

Two things left to do are the seats (front and rear) and a steering wheel. I'm thinking of wood seats and seat backs, maybe finished with spar varnish. The steering wheel will be either a 68-72 GM truck wheel, or 73-87 squarebody wheel. We'll see.
 

Attachments

  • wrap-earl-scheib.jpg
    wrap-earl-scheib.jpg
    52.1 KB · Views: 11
  • IMG_20230704_190736565.jpg
    IMG_20230704_190736565.jpg
    176 KB · Views: 13
  • IMG_20230704_190750532.jpg
    IMG_20230704_190750532.jpg
    215.4 KB · Views: 11
  • IMG_20230704_190800455.jpg
    IMG_20230704_190800455.jpg
    199.6 KB · Views: 11
  • IMG_20230704_190859412.jpg
    IMG_20230704_190859412.jpg
    180.8 KB · Views: 11
  • IMG_20230704_190917141.jpg
    IMG_20230704_190917141.jpg
    113.8 KB · Views: 11
Sometimes God says "let's give this guy a break."

I had planned on installing a 68-72 15 inch reproduction GM truck steering wheel, but I hadn't quite figured out how to do it for sure. One plan was to buy the wheel and the Forever Sharp 3 Bolt Adapter For Club Car DS then set about drilling and tapping to bolt it up.

What slowed me down from pulling the trigger too quickly was the price. I've spent more on this project in 5 weeks than I spent in 5 years on my Model T, and that includes installing hydraulic disc brakes on the T!

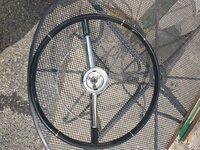
Shopping around I found a gently used reproduction 64-67 GM A body (Chevelle, Tempest, El Camino, Cutlass, Skylark) steering wheel nearby for about half the cost of the truck wheels I was looking at. Close enough.

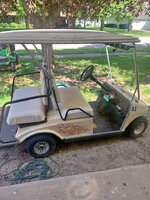
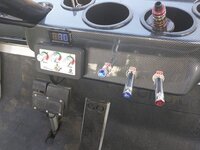
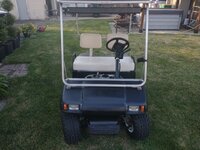
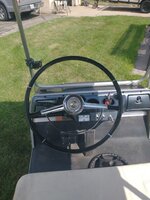
I picked up the wheel yesterday and pulled the old wheel off my cart to dry fit the new wheel and just get a feel for what I was going to have to do to mount it. The Club Car has a larger spline than the GM wheel, which I thought was odd but okay.

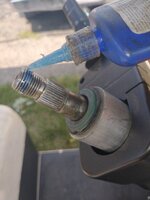
BUT the threaded end of the shaft protruded through the center spline of the new wheel, and the back of the new wheel spline hole butted up against the shoulder just above the splines and below the threads of the steering column. It couldn't be this simple, could it?

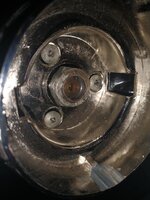
Almost. But in this case "almost" is close enough. I carefully installed the wheel nut and torqued it down. Then I took a test drive , bringing the old steering wheel and my socket and ratchet with me just in case.

It performed flawlessly. Satisfied that this was going to work (for awhile anyway) I set the steering so that wheels are straight, removed the wheel nut, applied some blue thread locker, and then torqued it down VERY hard; if it was going to fail I wanted it to fail now. It didn't.

So here we are, a rare instance of something working the easy way! All that having been said, because this thing only turns by friction (the nut against the front of the wheel and the back of the wheel against the shoulder of the column above the splines) it's not an ideal situation.

I certainly would never do this with a car, and you have to assess the risks for yourself if you want to do this with your cart; I don't go blazing around curves or driving at high speeds so I'm okay with it. We'll see what happens, your mileage may vary.

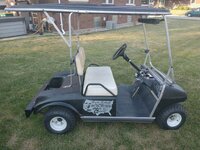
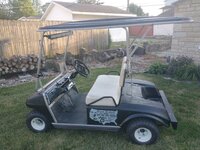
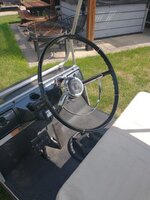
For perspective, the wheel is 16 and 3/8 inches outside diameter but is not obtrusive to getting into or out of the cart, even for the portly gentleman. I am 5'10" and close to 300lb's and it's fine.

It does interfere with fully opening the seat, but you can open it enough to just poke you head in, but if you want to do anything in there you'll have to take the seat out entirely, which is what I do anyway.
 

Attachments

  • IMG_20230707_100631241.jpg
    IMG_20230707_100631241.jpg
    272.3 KB · Views: 5
  • IMG_20230707_100647105.jpg
    IMG_20230707_100647105.jpg
    129 KB · Views: 3
  • IMG_20230707_101100639.jpg
    IMG_20230707_101100639.jpg
    88.5 KB · Views: 4
  • IMG_20230707_111529422.jpg
    IMG_20230707_111529422.jpg
    152.6 KB · Views: 5
  • IMG_20230707_101417557.jpg
    IMG_20230707_101417557.jpg
    161.1 KB · Views: 6
  • IMG_20230707_101412262.jpg
    IMG_20230707_101412262.jpg
    139.2 KB · Views: 5
Top